How to Install Interior French Drain – Secrets Pros Use
A wet basement isn’t just annoying, it can wreck your foundation over time. That’s where an interior French drain comes in. It’s a smart way to channel water away before it causes damage.
Here’s a quick breakdown on how to install one so your home stays dry and worry-free.
How to install interior French drain?
Cut a trench, lay perforated pipe on gravel, connect to a sump pump, backfill with gravel, and reseal with concrete.
Key Takeaways
- Interior French drains keep basements dry by redirecting groundwater to a sump pump.
- Installing one involves cutting a trench, laying perforated pipe, and sealing with gravel and concrete.
- Benefits include preventing mould, musty odours, and costly foundation damage.
- Regular maintenance ensures long-lasting performance.
- DIY is possible, but professional installation offers speed and precision.
What Is an Interior French Drain?
An interior French drain is basically your basement’s escape hatch for water. It’s a trench dug along the inside perimeter of your foundation, fitted with a perforated pipe.
Water seeps in, flows through the pipe, and gets directed to a sump pump or drain. Instead of pooling in your basement, it’s quietly carried away.
Think of it as low-key armour that keeps your foundation dry and your space livable.
Benefits of Installing an Interior French Drain
An interior French drain is like a backstage pass for water—it never clogs the main show. By giving water a hidden escape route, you keep basements dry and foundations solid.
It also cuts down on musty smells, mould growth, and surprise puddles that wreck flooring. Long term, you save cash by avoiding major repair bills and keeping your home’s value intact.
The real win? Peace of mind. You don’t have to stress every time it rains, because your drain system quietly handles the mess for you. And while it works well, some homeowners still wonder, What are the disadvantages of a French drain?, a fair question when weighing the pros and cons of any system.
Tools and Materials Needed
You don’t need a contractor’s warehouse to pull this off, just the right basics. Grab a jackhammer or concrete saw to cut the trench, plus a sturdy shovel for clearing it out.
You’ll need perforated pipe, gravel, and filter fabric to keep water flowing and soil out. Don’t forget a wheelbarrow, buckets, and safety gear like gloves and goggles. Keep it simple, keep it sharp.
Step-by-Step Installation Guide
1. Mark the Drain Path
Start by deciding where the drain will run. Usually, it hugs the basement’s perimeter. Mark the path with chalk so you know exactly where to cut.
2. Cut and Remove Concrete
Grab a concrete saw and cut along your chalk line. Break up the slab with a hammer drill, then haul out the chunks. You’re left with a trench, not a warzone.
3. Excavate the Trench
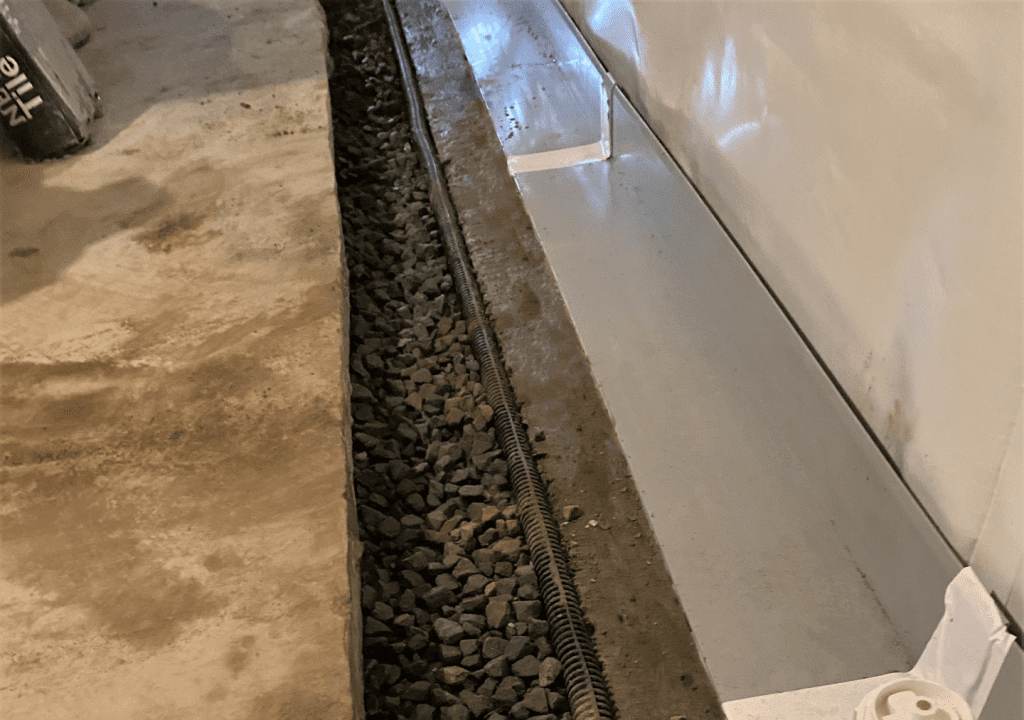
Dig down about a foot. Keep the trench wide enough for pipe, gravel, and breathing room. Don’t over-dig—you’ll just give yourself extra back pain.
4. Lay a Gravel Base
Shovel in a few inches of clean gravel. This sets a stable base and helps water move instead of pooling. Think of it as the sneakers under your suit—support matters.
5. Position the Drain Pipe
Drop in a perforated pipe with holes facing down. Wrap it in a filter sock if you want extra defense against soil sneaking in. Keep a slight slope so gravity does the heavy lifting.
6. Connect to a Sump Pump
Run the pipe to a sump pit. Install a sump pump if you don’t already have one. That pump is the muscle that kicks water out and keeps your basement dry.
7. Backfill with Gravel
Cover the pipe with more gravel until it’s just below floor level. Gravel keeps water flowing while blocking soil from crashing the party.
8. Replace the Concrete
Mix fresh concrete and pour it back over the trench. Smooth it out so the floor blends in again. Once it cures, you’ve got a hidden system working 24/7.
9. Test the System
Run some water near the drain path and watch it disappear into the sump. If it flows smoothly, congrats—you just installed a basement’s secret escape hatch.
Common Mistakes to Avoid
A big slip-up is skipping a filter fabric, which lets soil sneak in and clog your system. Another? Using the wrong gravel size so water can’t flow smoothly.
Don’t forget the slope, if your pipe isn’t angled right, water just sits there. Take the time to check each step and you’ll save yourself a soggy basement later.
Maintenance Tips for Long-Lasting Performance
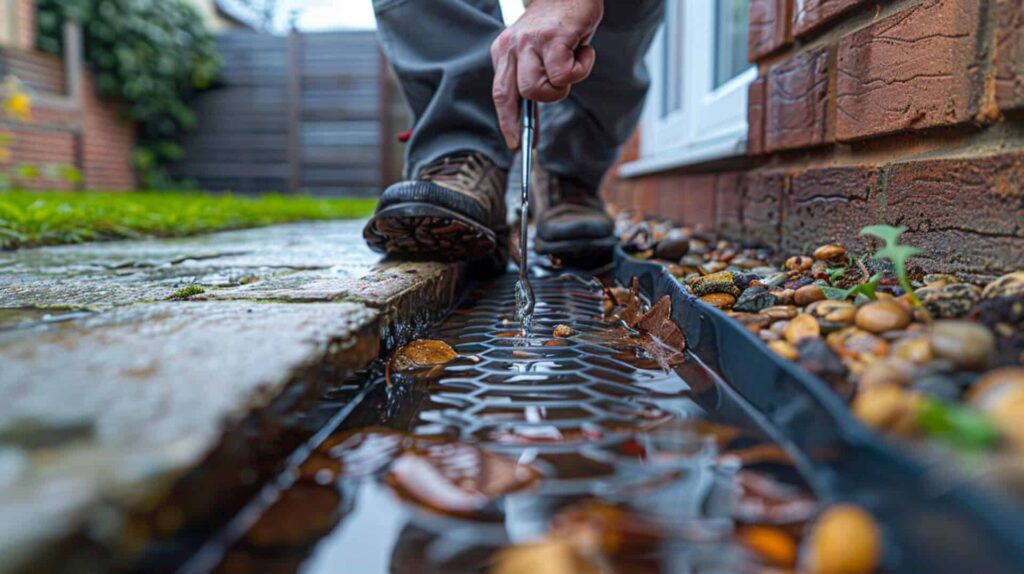
Don’t let your French drain turn into a forgotten project. Check it twice a year for clogs, especially after heavy rain. Clear out leaves, dirt, or any sneaky roots trying to move in.
If you spot slow drainage, flush the pipe with a garden hose to keep water moving. For a more thorough maintenance solution, professional French drain cleaning in Pompano Beach can help ensure your system runs efficiently. A little upkeep now means your basement stays bone-dry without surprise headaches later.
Professional vs DIY Installation
Going DIY with a French drain can save money, but it’s no walk in the park. You’ll need tools, time, and a strong back.
Hiring pros means you pay more upfront, but you get speed, precision, and peace of mind. If you’re not into trial-and-error with your basement floor, professional help is usually the smarter play.
Frequently Asked Questions
1. Do I need a pro to install an interior French drain?
Not always. If you’re handy with a jackhammer and patient with cleanup, you can DIY. Big leaks or foundation cracks? Call in backup.
2. How long does installation take?
Usually two to three days. Add extra time if your basement’s packed with stuff.
3. Will it stop all water problems?
It handles ground seepage like a champ. But if water’s pouring through walls, you’ll need more fixes.
Conclusion
An interior French drain isn’t a flashy upgrade, but it’s the quiet hero that keeps your basement dry and your foundation solid. Once installed, it saves you from water headaches and endless patch jobs.
Think of it as insurance with style, low effort, high payoff. Do it right, and you’ll turn a once-problem area into a worry-free zone that just works.